Our journey to improved SecOps: Instant benefits from Azure Sentinel
12.05.2021
Blogs
Hello again, this is the second part of our Azure Sentinel blog series about our journey towards more secure and modern SecOps.
If you're new here, here's the first one: How and why we chose Azure Sentinel.
In this article, you'll learn about instant benefits you can get from implementing SIEM & SOAR solution Azure Sentinel and why that’s important.

1. Start using Azure Sentinel without investments
By now you already know that Azure Sentinel is a cloud-native SIEM/SOAR solution. This means that you don’t have to go through lengthy planning, installation, or hardware acquirement processes.
Yes, some planning needs to be done before deploying Azure Sentinel workspace, but Sentinel is just a few clicks away afterward. The good news is that you don’t have to pay anything until you ingest data.
For us and everybody else, this means that we can start using Sentinel without any investments and if (for somewhat reason) Sentinel does not meet our expectations, it is possible to delete the workspace and stop paying for the solution right away.
2. Connect cloud resources
Office 365
Connecting some cloud resources like Office 365 is really easy if you do have the necessary permissions (read/write permissions to Sentinel workspace and Global Administrator or Security Administrator in Azure AD tenant). All you need to do is to find the connector page and enable the connector.
Exchange Online
Insights from the Exchange Online activities were important for us, as we wanted to see additional permissions being granted to mailboxes (which mailboxes have been affected and who has added the permissions).
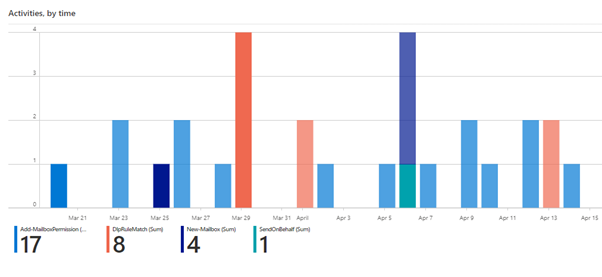
Once the Office 365 connector is enabled, we immediately got the workbook showing the overview of all activities in Exchange Online.
The following chart shows results for activities like the addition of mailbox permissions, mailbox creation, DLP rule matching, and sending emails on behalf of other users. However, it is possible to filter the data by any other activity and get more detailed results instantly.

Azure Active Directory
Azure AD is another cloud resource. If it gets connected with Sentinel, one of the most valuable outcomes is the workbook, that shows locations, device types, applications that are authenticating to Azure AD, and other useful information. If logons from suspicious locations were shown then, we knew that this has to be analyzed as this could be a malicious actor trying to log in. In our case, we found an obsolete connection from a cloud service, which was not used anymore.
3. Connect on-prem resources
Active Directory (AD) domain controllers usually are the most important on-prem resources we want to connect to a SIEM system. To do that, a Sentinel agent needs to be installed, that uses HTTPS to send the events to the Sentinel workspace (if your domain controllers don’t have connectivity to the internet, there are other options available).
Once the agent is installed, it starts sending data, and we can use a built-in workbook to get an insight into all the activities in AD.
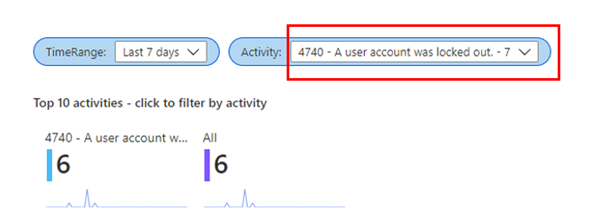
For example, account lockout or failed logon events can be viewed, when filtering by event 4740 we can view lockout events. It is possible to drill down further to see which accounts were locked out:

It is possible to filter by Activity to review all other events in AD.
Here’s an interesting use case from one of our customers.
The agents on domain controllers were deployed, and we wanted to see account lockout events, but Sentinel didn’t show anything.
As we did not believe it, we started to troubleshoot the issue. The root cause for this was that lockout policies were not configured, thus Sentinel helped to find a major security misconfiguration in AD.
That’s it for today.
In the next episode – The data sources you can connect to Azure Sentinel.
Let's talk about your organization's journey towards improved SecOps!
Fill in the form to talk with the expert.
